Monday, September 27, 2010

Boo!


I don't do Halloween! But many people do! Interestingly enough, Halloween is the number two seller for decorations and home decor. At my home we choose to celebrate the harvest season. I love the colors that you see this time of year. A friend who does celebrate Halloween asked me to create a spooky card for a gathering she is hosting. Hopefully this will fit the bill!

Here's hoping you have a wonderful week!

Lori


Card Recipe

Finished Design 5 1/4 by 5 inches

Card stock - Bazzill
Ink - Sentiment - Memento - Tuxedo Black
Ink - Background - Close to My Heart - Moonstruck, Outdoor Denim, Indian Corn Blue
Ink - Moon - Close to My Heart - Sunflower, Autumn Terracotta
Die Cut - Provocraft - Cricut Lite - Celebrate with Flourish
Stamp - Sentiment - Studio G

Directions -

1. Cut mask (circle) for moon. Place negative on white card stock (circle cut out) and
color.
2. Place cut out of moon over colored moon to protect the image and color remainder of
card stock with blue inks as desired.
3. Adhere desired die cut (4 inch cut in this case) and stamp sentiment.

Sunday, September 26, 2010

The Scoop...


Can I just say this has been a bizarre weekend for me? It started out yesterday when I decided to feed our horse Ally some horse treats. Simple right? Oh, no.... I decided to go out to the fenceline as I often do in sandals. Well, while Ally was busy chowing down on snacks one of the sheep decided my little toe looked like the perfect bite size morsel! OK, who knew that sheep have such sharp teeth? That crazy ram reached through the fence and took a HUNK out of my toe! I really don't like the taste of mutton but boy that guy may wind up in my freezer yet... LOL... Maybe it was the lovely shade of nail polish...

Hubby and I rushed to Lexington yesterday afternoon to deliver a couple of puppies to their new home and what did we forget? The papers! Both of us were flustered after the sheep incident. John had to patch me up after the dastardly deed. But thankfully everyone was fine with us mailing their stuff. But it could have easily been a tougher situation.

And then today, I helped out after church services with one of our youth activities and before I even got in the door I twisted my knee! Yikes! I'm down but not out so to speak. I think I am falling apart, literally!

In today's card I used an image of a large dog colored to look like a Saint. I couldn't resist using the sentiment from Hero Arts as it seemed to fit this image to a tee! Thanks so much for reading and posting feedback. And make sure you don't take bare toes near hungry sheep! :-)

Lori


Card Recipe

Finished design 5 X 7 inches

Card stock - Bazzill
Card stock - image - Gina K. Pure Luxury
Designer Paper - Basic Grey - Max & Whiskers - toby/max
Stamp - Image - Eat Cake Graphics
Stamp - Sentiment - Hero Arts
Ink - Image and Sentiment - Memento Tuxedo Black
Ink - sponged on background - Memento Desert Sand
Ink - Coloring - Copics
Pearls - Kaisercraft
Ribbon - Offray (created with my Bow Easy)
Stickles - Ranger - Diamond
Punch - EK Success
Adhesive - Scotch Brand Dimensional Foam

Friday, September 24, 2010

The broad side of a barn...


When I spotted this faux barn board technique, I immediately thought of my Mom... Before anyone gets upset and thinks I am being a brat, let me explain. One of my Mom's favorite sayings when I was little was "I couldn't hit the broad side of a barn..." She would say this when she toss something in the trash and miss pitch something out of the way and miss... I always wondered how ANYONE could miss the broad side of a barn... I guess that's why the phrase is so funny to me... :-)

The details can be found on this week's Splitcoaststamper tutorial but my design was a little different so I will detail below. Have a great weekend!

Lori


Card Recipe

Finished Design 5 X 6 Inches

Card stock - Bazzill, Georgia Pacific
Stamp - Sentiment - Our Daily Bread Designs - Scripture Series 1
Paint - Making Memories - Spotlight
Reinkers - Memento - Desert Sand, Rich Cocoa
Ink - Memento - Rich Cocoa (Sentiment)
White Glue
Foam applicators
Die Cut - Provocraft - Home Accents
Flowers - Unknown
Pearls - Scrappers Must Haves
Jute

1. Paint light color card stock with mixture of white paint and reinkers. You can create the look with a medium shade of brown. Since I did not have that available, I mixed the paint with 2 drops of rich cocoa and 2 drops of desert sand. Apply to cardstock in even strokes, allowing some of the card stock to show through.

2. Dry with heat gun, taking care not to scorch the paper.

3. Apply thin layer of white glue with foam applicator, allowing it to dry until tacky.

4. Once glue is tacky, apply layer of white paint in strokes taking care to not over apply. Allow to dry or use heat tool, again taking care not to scorch.

5. Watch paint crackle and begin to look like barn board. Cut to desired size!

Monday, September 20, 2010

My how quickly summer fades...


It seems like yesterday we were gearing up for Memorial Day weekend. This summer has FLOWN by. I purchased mums today and mulled over pumpkin options at a roadside farmers market. Over the weekend, I purchased my first flowering cabbage. I admired one years ago in Alexandria, Virginia. John and I marveled at how it still looked so beautiful in decorative pots along the sidewalk in late December. This year I am going to try my hand at raising one and hope to have beautiful green and red foliage well into November.

Even though I have dusted off the autumn decor and planted a few fall flowers, I can't seem to let go of summer. It just seems too soon to let such a good friend leave. So in honor of the changing of the seasons I decided to pull out one of my first Gina K. Designs sets and whip up a card. As you can see, I stayed true to the red, white and blue of summer. The red and white designer paper was actually one side of a Christmas paper I had left over and just hated to throw away. It seemed like the perfect fit for this card. The topiary contains a mixture of black eyed Susans, roses and maybe a little grape hyacinths... probably a little late in the year but I liked the effect! Happy Monday to you and grab a little dose of late summer sunshine this week before fall makes it's presence known...

Lori

Card Stock - Georgia Pacific, Bazzill
Card Stock - Image - Gina K. Pure Luxury
Designer Paper - Bo Bunny - Tis the Season Snowflakes
Stamp - Image and Sentiment - Gina K. Designs - Lord of the Season by Nina Brackett
Ink - Image - Memento Tuxedo Black
Ink - Background - Memento Summer Sky
Ink - Sentiment - Memento Lady Bug
Ink - Coloring - Copic
Punch - Martha Stewart
Die Cut - Spellbinders - Small Labels
Ribbon - Offray Red Satin 5/8 in

Sunday, September 19, 2010

It is true!


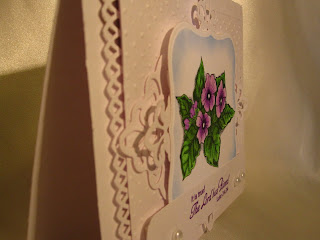
This week's challenge over at Our Daily Bread Designs involves creating something bright and white! The idea is to make a card with minimal coloring. This is something that is particularly challenging for me. (I guess that's why it is called a challenge, right?) I love color! It just seems strange to not pulled out the bright designer paper and card stock.

I have created this type of card one time before and surprisingly I REALLY liked the results. Naturally, I thought it was all a coincidence and that I really could not make this type of card. So with that thought in the back of my head, I set about to work on the ODBD challenge. And did I surprise myself! I really LOVE the results this time and I hope you do to! Take a look and take the challenge yourself! Freedom from color rocks! Have a wonderful Sabbath day!

Lori


Card Recipe

5 x 6 inch designs

Card stock - Georgia Pacific - card, Neenah - Image
Ink - Image - Memento - Tuxedo Black, Copic
Ink - Sentiment - Memento - Grape Jelly
Ink - Background - Memento - Summer Sky
Image - Stamp and Sentiment - Our Daily Bread Designs - The Lord Has Risen
Punch - Martha Stewart
Embossing - Provocraft - Swiss Dots Folder
Smooch Spritz - Vanilla Shimmer
Scor Buddy
Die Cuts - Spellbinders - Fleur De Lis Pendant, Labels One
Corner Rounder - 1/4 in - Crop A Dile
Pearls - Scrappers Must Haves
Adhesive - Scotch Brand Foam Tape


Directions

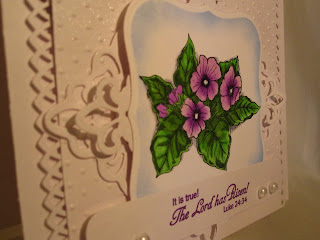
1. The body of the card was cut to 10 x 6 inches and scored at the 5 inch point with my
Scor Buddy.

2. The second layer was cut to 5 X 6 inches and edged on two sides with MS punch.
Adhere to base with adhesive foam.

3. The third layer was cut to 5 x 6 inches, embossed with the Swiss dots folder leaving
approximately 3/4 in outside of the embossing folder. I then highlighted the non
embossed areas by scoring those in my Scor Buddy.

4. I cut my pendant and smaller pendant out of card stock. These components along
with the embossed layer were covered with Vanilla Shimmer Smooch and allowed to dry.

5. I colored my image and then cut/embossed it with the Labels One die. Once this was
done, I lightly sponged around the edges with the Summer Sky ink BEFORE removing
the die.

6. Once the Swiss Dot base was dry, I adhered it to the punched layer. I then layered
the pendant fleur de lis and the smaller pendant (which I cut in two and placed on
each side as a second layer).

7. After layering and adhering to the card, I stamped my verse on card stock, cut it down
and used my corner rounder to soften the edges. I adhered it with foam dots and
embellished with pearls!

Copic Colors

V00, V04, V09
YG07, YG17, YG67
C2

Saturday, September 18, 2010

Western Theme Treat Bag


I managed to make it into bed this morning at 6AM after our all night crop. I stumbled out at 9AM and made it to the couch downstairs where I crashed and burned until 12:30PM. If you eat an Oreo after noon does that count as breakfast? :-P

We had a great time. I only colored one image but boy was it fun! One cool idea I picked up from some of the ladies. They bought wallpaper sample books for a buck from a store when they closed. Then they used Acid Free on the samples to use in their albums... cool huh? Never thought of it... but a great idea! That's a wonderful way to recycle!

For today's post I created a western style treat bag for a mission's event we will be going to at our church soon. I thought it would be cool for the kids to get their own special "memento" of the night. I planned on stuffing them with trail mix and other good things that fall into the theme but don't hype the littles up too much! I'm sure their parents will be grateful! Well I hope you are having a super Saturday. I intend to power nap and do some creating! Blessings to you and yours!

Lori


Project Ingredients

Brown lunch bag
Card stock - Bazzill
Embossing Folder - Provocraft - Cuttlebug - Moroccan Screen
Punch - Marth Stewart - Modern Garland
Die Cuts - Provocraft - Cricut - Horse - Animal Kingdom (6 1/4 in), Badge - Create A Critter (3 in)
Ink - Sentiment - Memento - Tuxedo Black
Stamp - Sentiment - Howdy - Close to My Heart
Jute

Friday, September 17, 2010

Autumn Splendor


Well I'm off to teach at an all night crop tonight! Did I take a nap today? No. Did I rest on the couch? No. Did I do laundry? Yes. And did I run errands including 2 hours in the beauty shop getting my hair done? Yes. So this should be an interesting night! An almost forty year old woman trying to stay up all night and crop... I could do this in college and function but now? LOL... Me thinks it will be a long night... So in case I don't regain consciousness anytime tomorrow I thought I would go ahead and post! Pray for me ladies... It's going to be an interesting night! More details to come...

Lori


Card Recipe

Finished Card 5 X 5 inches

Card stock - Bazzill, Gina K. Pure Luxury
Designer Paper - Chatterbox - Sunny Plaid
Stamps - Image and Sentiment - Gina K. Designs - Autumn Splendor Stamp TV Kit
Ink - Image - Memento - Black
Ink - Sentiment - Memento - Rich Cocoa
Ink - Accent - Memento - Summer Sky - Sponged on edge
Ink - Coloring - Copics - YG17, YG67, E17, E29, Y17, Y18
Punch - Martha Stewart - Modern Garland
Die Cuts - Spellbinders - Labels 10, Petite Scalloped Circles Large, Fancy Tags

Thanks to Our Daily Bread Designs!

I am so excited! Yesterday one of my cards was selected as the Our Daily Bread Designs Stamping in Design winner! I love doing challenges and this one in particular! I am very blessed to have been fortunate enough to be drawn for the winner! If you haven't checked out this portion of the Our Daily Bread Design site, check out the announcement here here! I have posted the card below for a second look! Take a few minutes to challenge yourself and enter! It is so much fun!


I hope to be back later this weekend with some cool projects! I am teaching at an all night crop tonight. Please pray that my stamina and creativity remain awake! LOL... Blessings to you and have a wonderful Friday!

Lori

Monday, September 13, 2010

Just a Little Sparkle


I must admit bling SCARES me! I'm an accountant and anything flashy doesn't go over well. But I love snow and how can you create something wintry and not use some shimmer? I'm trying to get a leg up on some Christmas cards. And each week or so (if my plan comes to fruition) I will create a card or two to share. Then maybe by the time the 25th rolls around I will not be frantically throwing some cards together. Or even worse buying cards at the local discount store... :-) Maybe for once I will be ahead of the game... or maybe not... but I can always dream of that and a white Christmas... Hope you are having a wonderful day...

Lori


Card Recipe 5 X 7 inches

Card Stock - White - Georgia Pacific, Bazzill Birthstone
Designer Paper - Pebbles Inc. - Snow Fun Snowflakes - Green
Image & Sentiment - ODBD Peace & Joy
Versamark
Embossing Powder - Stamp n Stuff - Winterwonderland Opaque
Ink - CTMH - Indian Corn Blue
Glimmer Mist - Tattered Angels - Sapphire
Smooch Spritz - Silver Foil, Vanilla Shimmer
Ribbon - Offray
Stickles - Ranger - Star Dust

First I embossed the snowflake image and sentiment on a white piece of card stock. After embossing I sponged CTMH ink (Indian Corn Blue) on. I then wiped the excess ink off of the embossed image and sentiment (resist technique). To give my "custom paper" shimmer, I then spritzed the image with Sapphire Glimmer Mist (lightly on the edges). I also applied a light spritz of Vanilla Shimmer Smootch and Silver Foil all over. My final touch was to lightly apply Star Dust Stickles to areas of the snowflake that I wished to highlight. Voila! My image was a work of bling or art... whichever you prefer!

Wednesday, September 8, 2010

Wild Thing...


Have you ever been challenged? A friend of mine has "strongly suggested" I put in a card for a fun website she designs for. The challenge is to incorporate 3 colors, ribbon and two buttons. I REALLY have issues with buttons. I just can't seem to put them on anything I do and have it turn out right. So this time I took a gamble with her urging to do a little button therapy. I'm still not sure how I like it but hopefully Diane will like it!

Check the site out here!

When I was putting this card together, I decided I needed to trim one side of the red cardstock under my image. Well, guess what happened? My blade decided at that precise moment to become incredibly dull and just snag the paper. I took it out and decided it actually worked with my "wild theme." I love happy accidents! The stamp set actually has the hippo and elephant as two separate creatures but I loved how the elephant looked like it was "kissing" something. So I stamped the hippo twice, cut one out as a mask and then stamped over the image with the elephant. This way they look close enough to pucker up! Easy as pie... Yum! Chocolate or lemon? Whoo hoo!

Well here's hoping you are mixing it up and doing some challenges too! Blessings!

Lori


Card Recipe

Finished Design

5 X 7 Inches

Card Stock - Bazzill, Georgia Pacific
Card Stock - Image - Gina K. Pure Luxury
Designer Paper - Reminisce - Zebra Print
Image & Sentiment - Close to My Heart - You're Great (Love this set Emily!)
Ink - Image - Memento - Tuxedo Black
Ink - Sky - Memento - Summer Sky (sponged on)
Copics
Buttons - unknown
Ribbon - Gina K. Designs
Thread - DMC 310


Copic Combo

Elephant & Hippo - C0, C1, C2, C5, C7
Grass - YG07, YG17

Tuesday, September 7, 2010

Mojo Monday


Is it Friday yet? Oh, my goodness... we paid at work today for that long weekend.... I'm not sure vacations are worth it... LOL... I created this card for the contest going on over at Mojo Monday's site. Well as you can see it is TUESDAY and I am just getting around to posting it. After a busy day with family yesterday and a late night at Copic class I was too tired to post. I really hate having to work to support my habit... :-P

Thanks as always for your positive encouragement. I treasure each and every comment. Thanks so much and blessings to you!

Lori


Card Recipe

Finished Size

5 X 7 inches

Card stock - White - Georgia Pacific, Kraft - Gina K., Others - Bazzill
Card stock - Image - Bazzill - Simply Smooth
Designer Paper - Making Memories - Max Gingham, Bo Bunny Shabby Princess - Bluebell Blossom
Stamp - Image and Sentiment - Stampin' Up - Peace Within
Ink - Image - Memento - Tuxedo Black
Ink - Sentiment and Grass - Memento - Bamboo Leaves
Ink - Sky - Memento Summer Sky
Die Cuts - Spellbinders - Standard Circles Large, Petite Scalloped Circles Large
Punch - Fiskars (tag) card stock underneath trimmed to shadow
Ribbon - Unknown
Markers - Copic

Sorry, this is one I do not have the color scheme on... :-(

Monday, September 6, 2010

Farm Life by Theresa Momber for Gina K.


I am truly a farm girl and when this new stamp set came out on Stamp TV I jumped to order it. This time of year is especially nice. The days are growing shorter, the air is cooler and the animals are all enjoying the freshness in the air. The other night hubby and I even took a late evening golf cart ride to check out the stars. If it hadn't been so dark the neighbors would have thought I was nuts bundled up like I was in a blanket. It was nippy but we had a blast! This card is going to hubby. We had such a nice time the other night enjoying the view we share together. I hope you take time today to share the view with someone you love. Happy crafting!

Lori


Card Recipe

Finished Project

5 X 7 Inches

Card Stock - Image - Gina K. Pure Luxury - (cream)
Card Stock - Bazzill
Designer Paper - Karen Foster - Thanksgiving Dots
Stamp - Image and Sentiment - Farm Life by Theresa Momber for Gina K. Designs
Ink - Image - Memento - Rich Cocoa
Ink - Background - Memento - Rich Cocoa, Potter's Clay, Desert Sand, Tangelo, Dandelion (sponged on)
Ink - Coloring - Memento - Cottage Ivy, Bamboo Leaves (Trees), Memento - Desert Sand, Rich Cocoa (barn, etc)
Punch - Fiskars
Ribbon - Offray - 5/8" Brown Grosgrain, 1/2" Orange Satin

Sunday, September 5, 2010

Simple Sunday


Have you ever had a "burning bush" moment? Today's Sunday School lesson dealt with Moses and the burning bush. As I prepared for the lesson, I found several interesting facts. In Egyptian, the name Moses means "is born." It forms the second element in many Pharoahs' names including Raames at Atmoses. It appears that even though Moses was a Hebrew by birth his royal adoptive family thought of him as one of their own and labeled his as one "born into" their family. Second, the name Moses sounds strikingly like a Hebrew word which means "to draw out." Well, he was drawn out of the water so that would make sense. But what are the chances that the Egyptian name he was given would so closely mirror this incident of his early life?
And how ironic that he would later be drawn out of his comfort zone to do God's will.

So after killing an Egyptian because Moses saw the man beating a fellow Hebrew. He was forced to flee under a death warrant from his former family. It is at this point that Moses finds himself tending sheep for his new father in law. That is a long way from the palaces of Eygpt! Moses is now a man of about 40, happily doing his job and raising a family. Probably by this time he has forgotten about those long ago days when he roamed the royal palace. And then what happens? He encounters that burning bush and God says "listen up, Moses, you have a job to do!" I can just imagine Moses turning around to look over his shoulder and saying "who me?" Being human Moses spews and sputters as to why he can't do the job while the whole while God is giving him reassurances of what to say and do.

Well who else could have done this job? Who else could have led the Israelites out of Egypt? Moses was prepared by God from birth to take on this role. God protected him when the Israelite male babies were being murdered. God even saw fit to have him live under the same roof as the murderous Pharoah as a protected adoptive grandson. He knew the ins and out of the royal family and he knew how they lived and thought. He would be the perfect ambassador to gain freedom for his birth family. God knew the plan and it was perfect. Moses just had to be willing to be used!

Sorry to take so long on today's post but I wanted to share what I gleaned from our lesson. Here's hoping you have a blessed Sunday with your family!


Card Recipe

Finished size 5 X 7 inches

Card Stock - Georgia Pacific - White, Bazzill - others
Designer Paper - a Lori Special (instructions immediately follow the materials list)
Reinkers - Memento - Desert Sand, Rich Cocoa, Potter's Clay, Ranger Adirondack - Gold
Stamps - Image - Gina K. Designs Farm Life
Stamps - Sentiment - Gina K. Designs Autumn Splendor
Ink - Sentiment and Image - Memento Rich Cocoa
Ribbon - Gina K. Designs
Shaving Cream, Plastic Plate, plastic ruler, knife
Adhesive - Scotch Brand Foam Tape

To create paper

1. Fill plastic plate with shaving cream.
2. Place drops of reinkers on shaving cream.
3. Drag knife through shaving cream to swirl design being careful not to over mix.
4. Place white paper on top of shaving cream mixture and lightly press down.
5. Remove paper from shaving cream.
6. Scrape shaving cream off paper with edge of plastic ruler.
7. Trim pattern paper to size desired!

Happy crafting!

Lori

Saturday, September 4, 2010

SNTODBD17


Today's card was created for the Stamping In Design Challenge at Our Daily Bread Designs. I have to say this card was one of the most labor intensive I have done. I started on it last night. I had to run out to teach a Copic class and got home fairly late. This morning after attempting to sleep in... thoughts kept running through my head and I had to get up and act on them.

When I took it downstairs to show dear hubby, as I sometimes do, he went on and on about the card. But good hubbys do that right? But after I walked back upstairs and started to look closely at the card I GOT what he was talking about. And honestly it is truly a GOD thing! I had nothing to do with it. Take a close look at the lion. Do you notice that special glow around his head? Jesus is often referred to as a Lion in the Bible. In the books by C.S. Lewis about Narnia, the main character (Aslan) is a Lion. For those of you not familiar with these books, the adventures of Aslan are a fictional account of Jesus and his defeat of Satan. Well I did not intend to do that... the coloring just happened that way... So to God be the Glory! Blessings to you on this wonderful day!

Lori


I did have to use a mask of the lion image in order to create the sun image. Otherwise the remaining coloring was done with the resist technique. This is the first time in a while I have not used my trusty Copics. Hopefully it will not be the last.

Card Recipe

Finished size

5 X 7

Card Stock - Bazzill
Card Stock - Image - Georgia Pacific
Designer Paper - Kaisercraft - Neat (double sided, using both)
Image and Sentiment - Our Daily Bread Designs - Peace on Earth
Inks - Image and Sentiment - Versamark
Embossing Powder - Ranger Super Fine Detail Embossing Powder - Black
Inks - Sun (in order of application) Memento - Dandelion, Tangelo, Potter's Clay, Rich Cocoa
Inks - Sky (in order of application) Memento - Summer Sky, Desert Sand, Angel Pink
Inks - Ground (in order of application) Memento - Desert Sand
Inks - Grass - Memento Bamboo Leaves
Inks - Image - Tim Holtz Distress Ink - Tea Dye (Lion), Stampin Up - Going Gray (Lamb)
Applicators (sponge daubers on everything except the Lamb when I used a Tombow blending brush to apply light coats of gray ink to accent Lamb)

Punch - Martha Stewart
Ribbon - Unknown - 1 inch Satin
Pearls - Black - Kaisercraft Basics
Adhesive - Herma Dotto, Scotch Branch Foam Tape

Friday, September 3, 2010

Sugar, Corn Syrup and Salt...


What in the world could these three ingredients create? Candy Corn! Does anyone really eat candy corn or is it like the Christmas fruit cake that is re gifted from one home to the next? My Dad LOVED candy corn! And as soon as they appeared in the stores a bag would inevitably surface at our house!

There was something about chewing little colorful balls of wax that made me grimace.... and to this day I still grimace... But I LOVE looking at them. They are so colorful and fun! So when I saw this Friendship Jar Filler set from Papertrey Ink, I had to bite! (Pun intended)...

I hope to revisit some of those fond fall memories I have... And yes, maybe I will even eat some candy corn in my Dad's honor! Hope you make it a wonderful day!


Card Recipe
Finished Size
5 X 7 Inches

Card Stock - Bazzill - Black, Georgia Pacific - White
Card Stock - Image - Gina K. Pure Luxury
Ink - Memento - Tuxedo Black
Ink - Markers - Copic (colors below)
Stamp - Image - Papertrey Ink - Friendship Jar, Friendship Jar Fall Fillers
Stamp - Sentiment - Papertrey Ink - Friendship Jar Fall Fillers
Punch - Martha Stewart - Modern Garland Punch Around the Page
Embossing Folder - Provocraft - Cuttlebug - Mandarin Screen (black card stock)
Ribbon - Offray - 5/8 Satin Orange
Adhesive - Herma Dotto, Scotch Branch Foam Tape

The lid was stamped, colored and then cut out. I adhered it over top of the jar image with dimensional adhesive to give it depth.


Copic Colors

Fabric Lid - YR04, YR14
Twine - E13
Candy Corn - White - C1, Orange - YR15, YR18, Yellow - Y21, Y38
Shadow - C1, C2
Jar - (attempted to get that Mason Jar color) BG0000, BG11

Surprise!!! It's Best Bunny!

There is something about Granny Apple Green that just brings a smile to my face!  When the first signs of Spring appear you are sure to see...